Showing posts with label ACS. Show all posts

Wednesday, October 30, 2013

Checkpoint on a tablet

Checkpoint on a tablet

Yes you can use checkpoint on a tablet for check-in; There are a few different ways to implement this, each has pros and cons:
RDP Connection to Server:
With a normal network install of ACS you would need to basically remote desktop into your server to run acs from the tablet, we have instructions for using a app called RDP lite to do this here:  http://wiki.acstechnologies.com/display/ACSDOC/Setting+up+Checkpoint+on+an+iPad
You would also have to have the server setup to be a terminal server and possibly buy a license for each machine you want to run from Microsoft
A note about printing with this technique:
*Printers not connected to your network?
If you cannot connect your badge printers to your network through a computer, you can still connect them to your network using a wireless adapter. Purchase a wireless network adapter for your printer and you can connect it directly to your network. Then, you can access the printer from any computer on your network. This is especially handy for printing badges with an iPad: you don't need another computer in the check-in area, just the iPad and the printer. Dymo Corporation offers an adapter called the Labelwriter Printer Server. HP, Linksys, IOGear, and Lexmark offer similar products.
MS Surface Pro:
Another approach is the new Microsoft Surface Pro tablets – the Pro version of Microsoft Surface Tablet runs a full normal version of windows so you could install and use the full ACS product just like you would on a laptop and use that for check-in.  This includes a USB port for hooking up a badge printer if needed.
Ondemand:
Another solution is our Ondemand product – Ondemand is a service we offer where instead of you having ACS on your server onsite, we install it here in our machine and you connect to it via a thin client, of have apps in both the iOS and android app stores that will allow tablets to connect to that server and let you use a tablet for check-in.  You can print from PCs as normal but currently there isn’t a easy way to print from the tablets, only check-in.

Tuesday, September 10, 2013

Text Messages in Access ACS

To send a Text Message in Access ACS members will first need to opt in to receiving them.

There are a few different ways to opt in.

1) You can place the opt in script from admin/options/weblinks on your website:
admin/options/weblinks:
link on webpage:


With most providers you can also send a message to sms@churchlife.mobi with the text "JOIN" and it will opt you in.

Also in access acs if a member edits their phone number they can opt in at that point as well:


As long as they have opted in to receive them you can send a txt message in access acs:

 To send a text message
  1. View an activitiesclasssmall group, or special group roster.
  2. Select the individuals you want to send a text to. To select all the individuals displayed, select the checkbox beside Name.
  3. In the second I want to drop-down list, click Send a text.
  4. Click Go.
  5. Enter your text message in the text box. You are limited to 140 total characters for your message.
  6. Click Text Now.

If any of the individuals you select are not signed up to receive test messages, you are given the option to send those individuals an e-mail instead. See Composing a Messagefor more information about messaging options.


Thursday, September 5, 2013

Access ACS with Ondemand

If you signup for Ondemand you get access acs for free; all you have to do is activate it.

To activate Access ACS you will need to perform a upload records to Access ACS. In the signup process make sure the email you put in is one that you can check - you will get your first login via email once the account has been activated.  It should take only a few minutes.

You will have to check the "I agree to charges" box but there will not be a charge beyond what you pay for ondemand unless you opt in later for online giving; there is a small additional fee for online giving.

To upload:

 To upload records to Access ACS
  1. Under Advanced Tools, click on the Admin Utilities tab.
  2. In the drop-down list, select Upload Records to Access ACS, then click Go .
  3. If you have an active Access ACS account, the Select Records to Upload to Access ACS window displays. Mark your selections and click Upload to complete the process.
  4. If you have an inactive Access ACS account, the program informs you the account is inactive. You can contact ACS Support to reactivate your account. Click OK.
  5. If you are in the process of having an Access ACS account created, the program asks you to try uploading records later. Click OK.
  6. If you do not have an Access ACS account, the program gives you the opportunity to create one.


Wednesday, February 13, 2013

Sending Out Tax Statements from ACS People


Sending Out Tax Statements from people.


3 Ways:

1)  Old fashioned by mail
2)  Access Acs
3)  E-Mail via constant contact


Old fashioned by mail
Pros:  Everyone understands how to get them
Cons:  Stamp Costs, changes require new mailing  

How:  Basically in The People Suite go into Contribution Reports and expand the category for statements.
You have a number of options - if you aren’t using the preprinted forms you’ll probably use the plain paper statement.  You will basically customize, print, put in envelopes and mail.


Access ACS
Pros:  Free, Easy to Update if you need to make corrections,  Instant Access
Cons:  Your membership will need to know how to login to access acs to view them, must have email for it to work

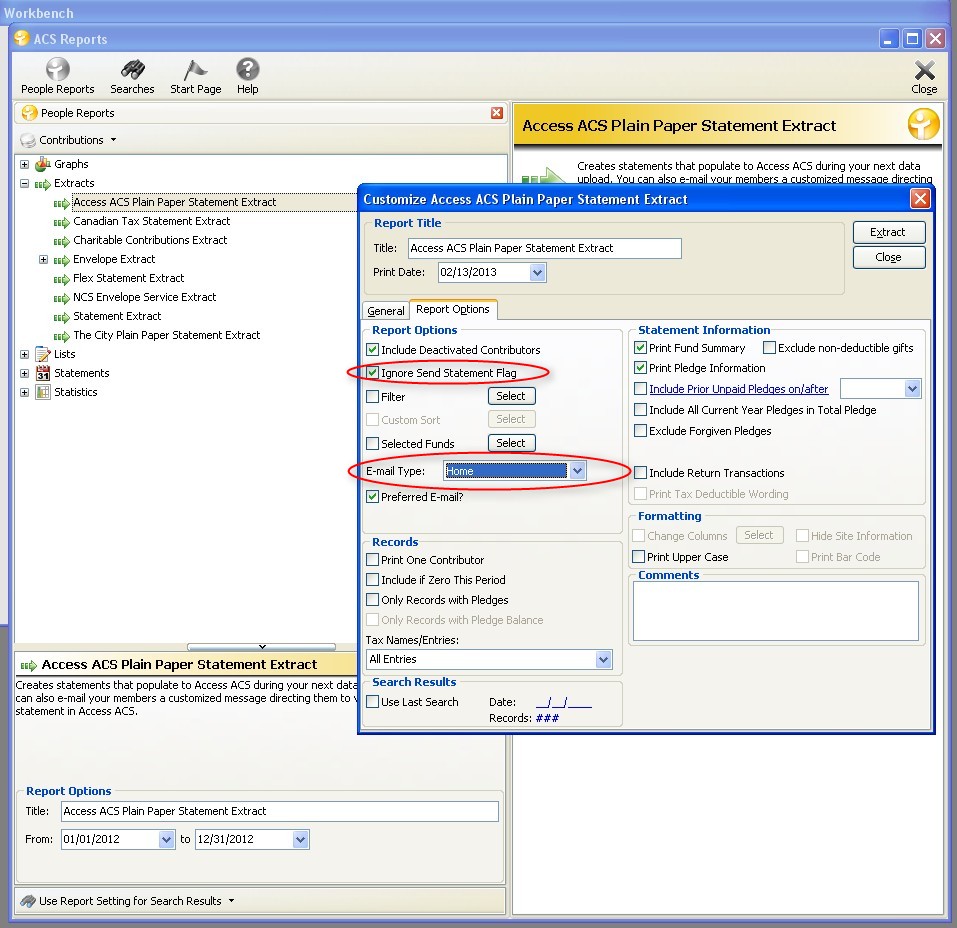
How:  Basically in The People Suite go into Contribution Reports and expand the category for Extracts.  Customize it to your needs - you may wish to check the option for “ignore send statement flag”  + you will need to select a email type.  After making your selections hit “extract”
Then do your normal upload records to access acs and it will automatically upload the pdf statments to view it.  
to view it they go to their “my giving history” page and there will be a button for the pdf tax statement.

**You can have the system email anyone who has a statement in the Admin/E-Mail Notifications Area in access acs.**

E-mail via constant contact
Pros:  Constant Contact will let you modify your email to be aesthetically appealing and helps monitor who received it.  Does not require access acs.  Instant - no mail delay.

Cons: you have to have a constant contact account to use this feature.  obviously they will have a email address to receive emails.

How:
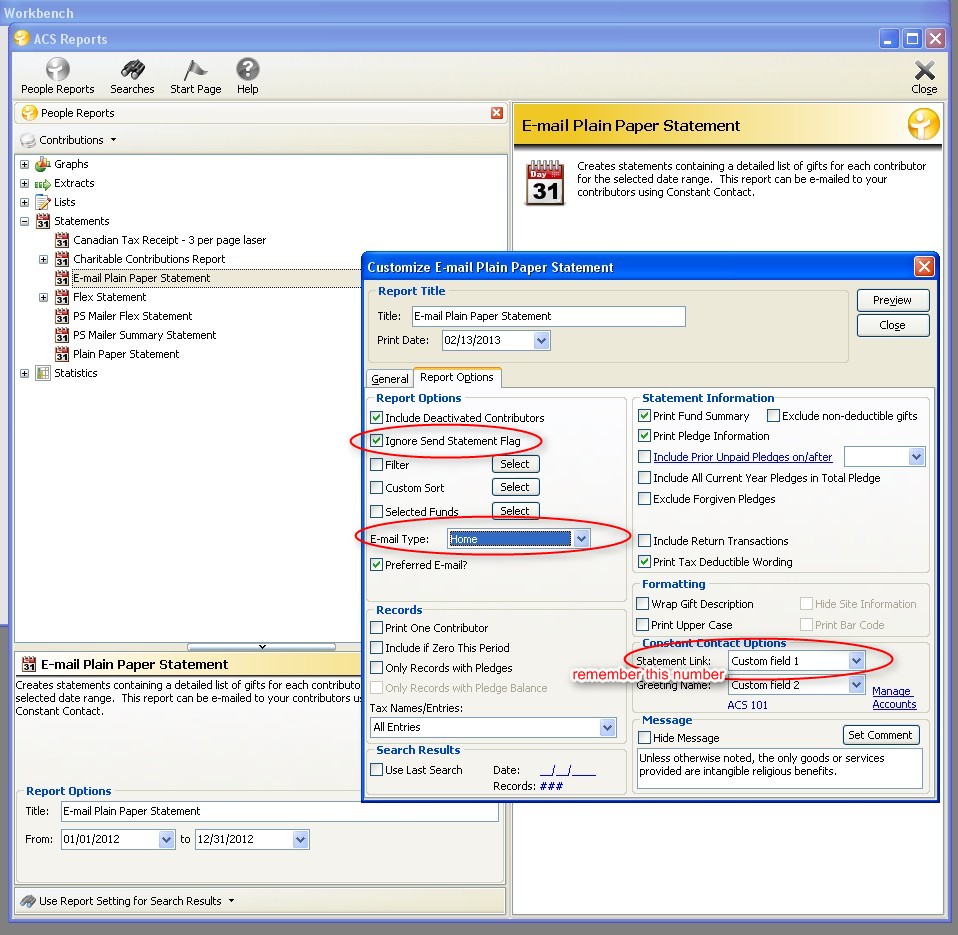
In The People Suite go into Contribution Reports and expand the category for statements.  Select E-mail Plain Paper Statement, customize it as you would the plain paper statement.  There is a link in the bottom right  in the constant contact options section where you pick a statement link; remember the number you choose here, you’ll see it when you are composing your constant contact email.  you can also put in your constant contact account info in the manage Accounts link.
Be sure you select a email type.

Preview the report, then it will offer to send the information to constant contact for you.


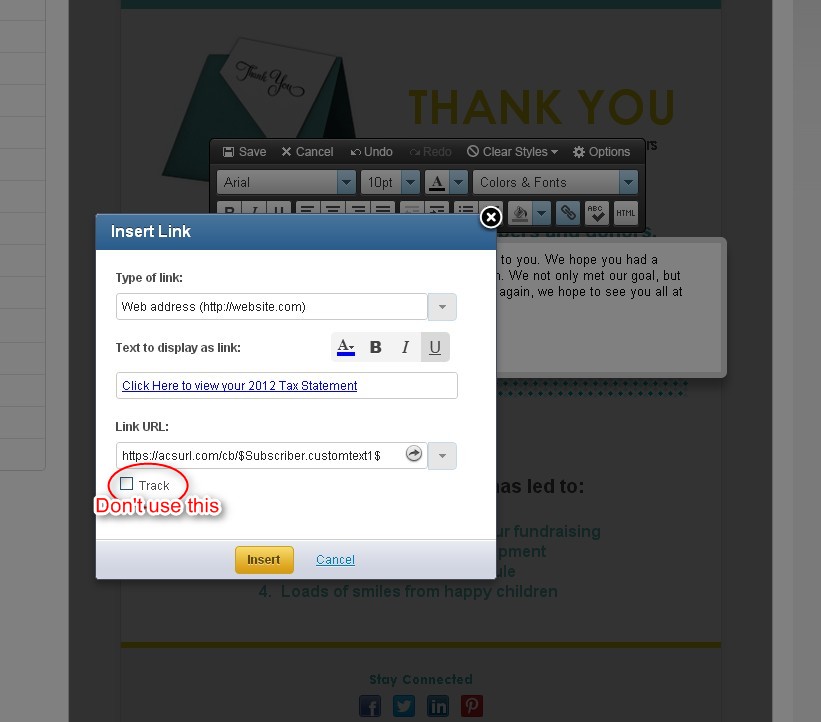
In constant contact draft a email and somewhere in the body insert a hyperlink and have it direct the recipient to https://acsurl.com/cb/$Subscriber.customtext#$  , replace the # with the number you choose in the extract for the statement link; for example if you picked 3 it would be https://acsurl.com/cb/$Subscriber.customtext3$


**You will want to not use google analytics or link tracking**

Send that email and when the member uses that link it will ask for their email, if that matches what you have in people for them they will be able to view/download the pdf tax statement .


Useful ACS Wiki Links:
Constant Contact: http://wiki.acstechnologies.com/display/ACSDOC/Sending+E-mails+in+Constant+Contact